If you’re in e-commerce, having your own app is a surefire way to get your products in front of more people. And if you play your cards right, having an e-commerce app can significantly add to your bottom line.
But don’t you need to pay a developer team tens of thousands of dollars to create and maintain an app? The answer is no. You can build your very own e-commerce app at a cost way less than developers would charge.
As an added bonus, you don’t need to learn technical concepts or spend months getting fluent in a coding language. In this article, we’ll show you how to build a no-code e-commerce app.
Creating a No-Code e-Commerce App: Getting Started
You’ll need to draw up a plan before you start building your no-code e-commerce app. Doing so is quite easy. First, jot down the features you want your e-commerce app to have.
After you’ve got your list of features, it’s time to sign up for Adalo, which is the platform you’ll use to build your no-code e-commerce app. I’ve worked with no-code app-building platforms for over a decade, and Adalo is the one that I’ve recommended more than any other.
Adalo is one of the easiest no-code app-building platforms available. It leverages a super intuitive drag-and-drop interface so you can start making your app right after signing up. But Adalo doesn’t sacrifice power for simplicity: You’ll have all the tools you need to bring almost any app idea to life.
How Your e-Commerce App Will Work: Its Parts
The e-commerce app you build will, like all other apps, have the following three components:
- The Frontend: This is the part of the app that your users will see and interact with. All your app’s visuals, screens, pictures, text, and more make up the frontend.
- The Backend: As the brain of your app, the backend works behind the curtains, bringing data your users request from the database to a screen, and vice versa. It will record order information, connect to a third-party app for payment processing, and more.
- The Database: Although your database is a backend component, stands alone in importance because all of your app’s information will be stored in your database, including:
- User profiles
- Merchandise
- Prices
- Discount Codes
- Order History
- Carts
- ...and anything else you want to store
Here’s one of the many cool things about building with Adalo: You won’t need to create any of these parts from scratch. Before you make your app, you’ll select a template with a pre-made frontend, backend, and database.
All you’ll need to do is change the appearance, layouts, and contents to meet your exact brand needs and tastes.
Building a No-Code e-Commerce App: Our 7-Step Guide
Armed with your Adalo membership, plans, and a little bit of knowledge, it’s time for the fun stuff: Building your app! While this e-commerce app-building guide will help you navigate the basics, you might have a few questions while making your app.
Don’t worry — Adalo has a thriving ecosystem with tutorials, help documents, and more. Here are the main resources you can use to get your questions answered fast:
- Adalo Help Documentation: For a thorough, written walkthrough of every single Adalo component, feature, and functionality, check out the help documents. This page explains major actions like publishing to the Apple App Store and Google Play Store and covers all the fine details and minutia on the Adalo platform.
- The Adalo Forum: Adalo has a community of over 100,000 users. Connect with them on Adalo’s forum! You can also ask questions about certain components, app-building methods, or anything else, and a seasoned Adalo vet will answer in no time.
- The Adalo App Academy: Adalo’s Academy has almost 80 lessons that teach you how to use specific functions and advanced components to create an optimal app. After studying a few tutorials, you’ll gain greater Adalo expertise.
It’s time to jump in!
Step 1: Grab the Adalo e-Commerce Template
Adalo has nearly 40 premade templates, but you’ll need to get the one specifically made for e-commerce apps. It’s full of all the features and functionalities you’ll need, like:
- A signup page so you can grow your network of members.
- A login page for members to begin shopping.
- Several screens for displaying your products.
- A cart page that shows shoppers the products they’ve picked, with the option to checkout.
Step 2: Customizing Your e-Commerce App
Since you’ve got your template, let's quickly look at the Adalo building interface. At the top of your screen, you’ll find the navigation bar with your profile button, a “Preview App” button, and a drop-down list to select the other apps you’re working on.
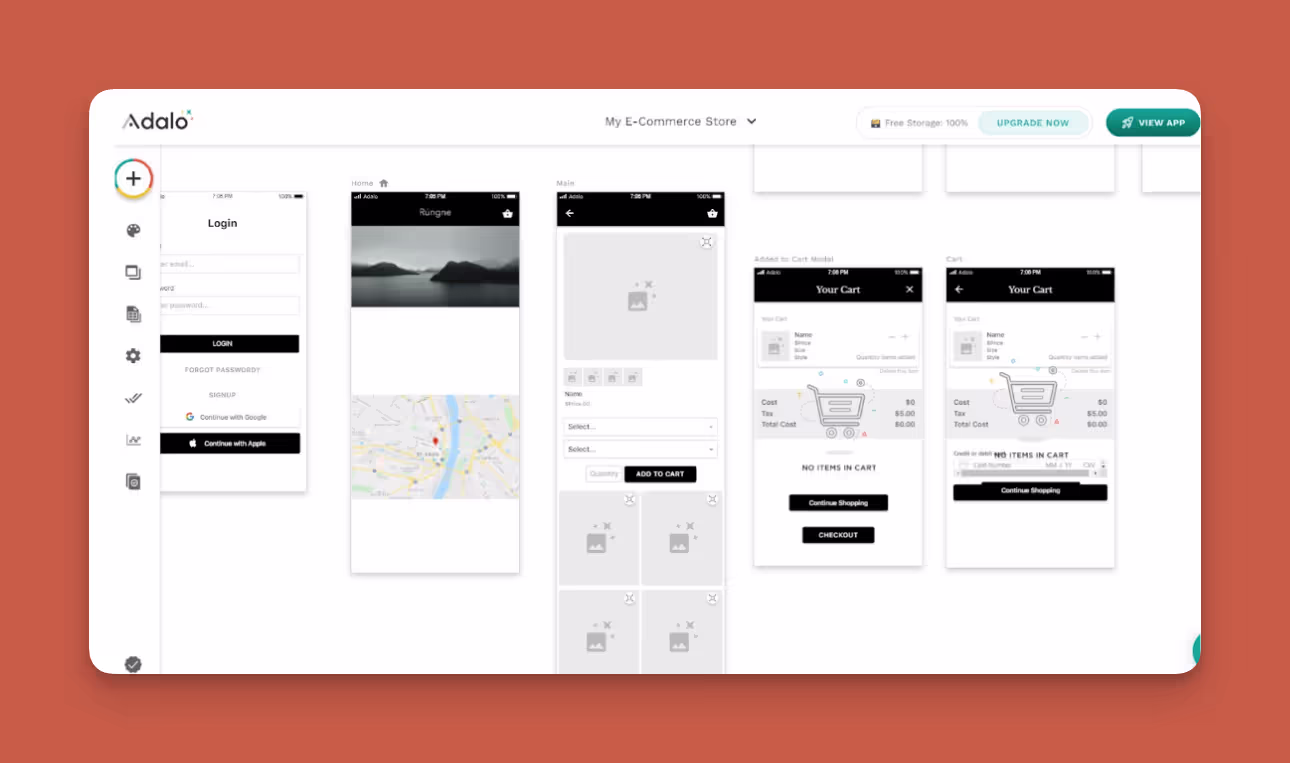
The center of your screen is your building canvas, which is a blueprint of all your app’s pages (pages are also called “screens.”) You’ll be able to see your app as you build it.
You can click on certain components on each screen, and an editing box will appear on your left. Use this to reconfigure your app’s appearance.
On the left-hand side of your screen, you’ll find the drop-down editing dashboard. With 8 different functionalities, this will serve as your main toolbox.
Here’s a list of your functionalities and the tasks that each one executes:
- Add Screen/Add Component (“+”): Use this to create new screens and add buttons, forms, text boxes, and more.
- The Branding Button (looks like a painter’s palette): Click this to change fonts and colors.
- View Screens: You’ll see a list of all your app’s screens and be able to navigate to the screen you want to edit easily.
- Databases: Use this function to see your databases — Step 3 will cover all you need to know about your database.
- Settings: Use this to connect APIs and fill out app info, such as your app’s meta description, which will appear on the app stores.
- Publish: This button will publish your app to the Apple App Store and Google Play Store. Step 6 will cover this in greater detail.
- Analytics: Want to see how many people are using your app, where they’re from, and what screens are the most popular? Just press this button.
- Version History: Adalo lets you work on up to 10 different versions of your app, but you can only publish one. Use these tools to access different versions of your app.
Step 3: Customizing Your Database
While Adalo integrates with databases like Google Sheets, Airtable, and Xano, I’ll assume you don’t have your own external database. Customizing your e-commerce template’s preloaded database is easy.
Click on the “Database” button on your drop-down editing dashboard, and a Database Collections tab will appear.
Collections are individual data groups organized like a spreadsheet in rows and columns. For instance, your e-commerce template contains 7 different collections, including:
- Users
- Cart
- Category
- Merch
- Order
- Size
- Style
Here’s how displaying database information works: Users enter their information on the frontend, and the backend takes it to the database. You can also enter merch, cart, and category data straight into the database, and the backend makes it visible to users on the front end.
Customizing your collections can be done at the push of a button. Just click the “Add Collection” button and type in your database’s properties, which are found in each collection’s vertical columns.
Properties in your e-commerce template’s Users Collection include name, password, email, physical address, order items, and orders.
Customizing properties is like customizing collections: Simply push the “Add Property” button at the bottom of each collection’s list of properties and enter your desired property.
Step 4: Adding New Screens, Elements, and Features to Your Frontend
Adalo’s templates provide everything your e-commerce app needs on the front, but you can add new screens or features by selecting the “Screens” button on your left-hand drop-down dashboard.
Want to delete a screen? Find the one you want to part ways with on the “Screens” list, click the three vertical dots button to the right, and select “delete screen.”
To add new screens, hit the “+” button at the top and select “Add Screen.” You can start from scratch or go with a pre-made screen.
You’ll probably want to add new elements like pictures, buttons, forms, and more. To do so, go to the “+” button, scroll down to the desired element, and add it to a screen. You can customize the size of each element and configure its placement by moving, stretching, or shrinking it with your mouse directly on the building canvas.
Step 5: Previewing Your e-Commerce App
Want to see how your app looks live? Go to the navigation ribbon at the top of your screen, press the shiny green “View App” button, and select “Staging Preview.” You’ll be able to see how your app appears and get a feel for its functionality on several devices like an iPhone 13 and Galaxy S20.
You can also share your app with the “View App” button. Select “Share Your App” and send the link to your app to people via SMS or email. Post the link to your app on social media to get more users. People will then access your app with their web browsers.
Step 6: Publishing to the App Stores
Adalo lets you publish as a native mobile app to the Apple App Store and Google Play Store. This capability can get your app in front of more users.
Publishing to the app stores is a bit of a process. First, you’ll need to ensure that you have the following before you begin taking steps to publish your app:
- A unique icon: A sleek, well-designed icon will help your app stand out from all the others it will be listed next to on the app stores. Create your own brand-specific app icon using a service like Looka.
- A well-written meta-description: First, search for other e-commerce apps that sell products similar to yours on the Apple App Store and Google Play Stores. Read through their meta descriptions and jot down keywords.
When you write your own meta description, work in these keywords and use synonyms for them. For instance, if a keyword is “nutritional supplements,” also use the synonyms “wellness products” and “mineral boosters.”
Doing this can increase the chances that you’ll “catch” folks searching for the same thing (supplements) but doing so by entering different keywords into their search bars.
- Gorgeous, eye-grabbing screenshots: While it may seem obvious, I can’t emphasize enough how important it is to provide only professional-looking screenshots that display your app’s key functionalities. Your screenshots are usually the first thing people will see, so they’ll need to shine. If they don’t, people might not download your app.
How to Publish to the Apple App Store
Navigate to Apple’s iOS developer web page, make an account, and pay your annual $99 iOS fee. Then, register for Testflight, which allows Apple users to test your app and give you feedback. Use this to improve your app’s functionality.
Then, go back to Adalo, hit the “Publish” button, and follow the instructions. Apple will take anywhere from a couple of weeks to a few months to approve your app for publishing.
How to Publish to the Google Play Store
Go to the Google Play Console website and create a developer account, which requires a one-time $25 fee. Opt-in for Google’s testing program and consider all the feedback Android testers provide.
After returning to Adalo, click the “Publish” button. Unlike Apple, Google’s wait time is much shorter — only a few weeks max.
If you want more information about publishing to iOS and Android, our guide breaks down the costs associated with app store publishing.
Step 7: Taking Payments
Because you’re building a no-code e-commerce app, you’ll want to be able to receive payments — use Adalo’s Stripe integration to do so. Setting up this feature takes minutes.
First, head over to Stripe’s registration page and create an account. Go back to Adalo, and click on the “+” button at the top of your left-hand drop-down menu. Select “Forms,” find the Stripe one, and provide your info. Drag your Stripe form to the desired screen, and you’re all set!
Getting New Users, Maintenance, and Analytics
After publishing your app, your work is far from finished: You’ll probably want to get more downloads (and more customers). Doing this takes planning, time, and patience. However, you can juice up your marketing strategy by reading our app-promo guide.
You’ll also want to visit your analytics page every day. Do this by clicking the “Analytics” button near the bottom of your left-hand drop-down dashboard. This feature allows you to track how much time users are spending on each screen, which screen/items are the most popular, and where your users are from.
Take this valuable information and use it as fuel for your marketing strategy.
It’s super important to immediately address any problems, like slowly loading or crashing screens, as soon as you find them out. Doing this will keep your app in pristine shape, which will reflect well on your professional image.