


Today, it’s easier than ever to build a mobile app. While you could outsource the task to a freelancer or app-building agency, using a no-code app-building platform is much more cost-effective and ensures you get the most value for your investment.
However, an enormous number of no-code app-building platforms exist, making it difficult to select the right one for your needs. Luckily, I’ve recommended no-code app-building platforms to businesses and individuals for over a decade, so your search can stop here.
There’s an app-building platform that I’ve recommended more than any other: Adalo.
I’m going to reveal what makes Adalo one of the leading app-building platforms today. In this article, I’ll walk you through how to build a mobile app without coding using Adalo.

What is Adalo?
Adalo is a no-code app-building platform that doesn’t require any technical or coding knowledge. That’s right — if you can create an email or social media account, you have the skills to build your app with Adalo. It’s that simple.
Leveraging an intuitive drag-and-drop interface, you’ll build your app like you were building a PowerPoint presentation. Just point and click on the features and functions you want to add, and drag over pictures from your desktop to your building canvas. Adalo lets you edit these directly on its building interface.
How Adalo Stands Out
A mind-boggling number of no-code mobile app builders are on the market today. Yet, I can’t stress enough that Adalo leads the pack. Here’s why I’ve recommended Adalo more than any other no-code app-building platform:
- Actually no-code and simple: Some app-building platforms claim to be no-code, but when you start, they ask you to name a recursion. Not cool.
Others are actually no-code, but they require you to spend a few months learning their complex building interface.
Adalo requires you to know zero code and has a simple learning curve. In fact, most people can start building their Adalo-made mobile app without reading any help documents or watching tutorials.
It’s hands down one of the most simple app-building platforms out there.
- Highly customizable flexibility with power: While Adalo is simple, it doesn’t sacrifice power. This means you can add almost any functionality you need, as Adalo comes packed with third-party plugins and a Zapier integration that connects to over 5,500 external programs.
Adalo is highly flexible, too. This means you’re not limited to the type of app you can build. Leverage Adalo to create a restaurant app, a CRM tool, an e-commerce app, and many more apps.
- It can make web apps and native mobile apps: Many no-code mobile app builders only let you create web apps, which are apps that users can access on their phones’ browsers.
Adalo is one of the few platforms that lets you create a web app and a native mobile app for publishing on the Apple App Store and Google Play Store. The capability to create both web and native mobile apps can attract more users.
Plus, native mobile apps come with more punch than web apps: They can use a mobile device’s processor, optimizing their speed, and they can use a device’s camera, GPS, and other built-in tools.
- It’s competitively priced: Adalo has a generous free version with useful features like a Stripe integration for payments and the ability to publish your app on the web. Adalo’s pricing tier starts at a reasonable $36/month.
And, if you need more power, you won’t have to pay an extortionate amount for the next tier — only a total of $52/month.
How To Build a Mobile App: Getting Started with Adalo
The first action you need to take to start building with Adalo is to head over to the homepage and create your free account.
Once you've done this, select one of Adalo’s pre-made templates to get started. If you’re a fan of starting from scratch, you can do so. But Adalo’s templates have everything you’ll need to simplify the building process, including app screens, preloaded functionalities, a database, and more.
Adalo’s Building Interface: 101
After you’ve set up an account and a template, you’ll land on Adalo’s app-building interface. It’s made up of the following three parts:
- The top ribbon menu: Located at the very top of your screen, this menu allows you to access other apps, preview your app to see how it looks live, and access your account settings.
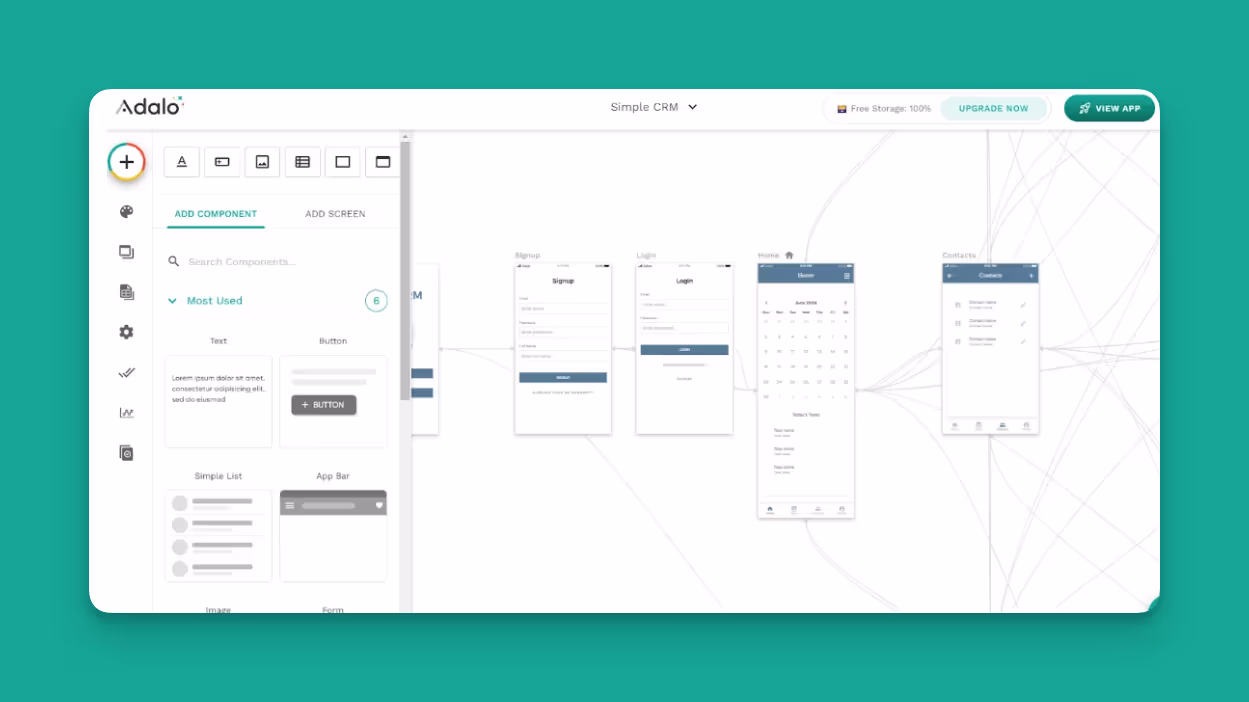
- The building canvas: This is the part in the center of your screen where the actual app building happens. You’ll see all your app’s screens and arrows that illustrate other screens for accessing each.
Click on the screen you want to edit; an editing box will appear on your left. This box lets you adjust the font, change the colors, and customize any other part of the screen. - The left-hand drop-down dashboard: Functioning as Adalo’s main editing tool, you’ll find functions that let you add forms and screens, select screens, change your app’s colors, edit your database, and more.
Start Designing Your Mobile App
Now that you know how Adalo’s app-building interface works, it’s time for the fun stuff: Building your app. The prebuilt template you selected will have all the screens you need to create a fully functioning app.
But you’ll want to change each screen's color scheme, font, and elements so your app jives with your tastes.
Doing this is easy. Just go to the left-hand drop-down dashboard. To add new screens, forms, elements, or buttons, press the top icon that looks like a “+” surrounded by a colorful circle.
If you want to change your app’s colors, hover over the button that looks like an artist’s palette, and the word “Branding” will appear. Click on this to change each screen’s colors and fonts. For easy access to your screen, press the “Screens” button and select the screen you wish to edit.
Set Up Your App’s Database
As I mentioned before, the template you choose will have its own pre-made database. Conveniently, Adalo lets you add and build your database to meet your needs.
Each database has two main parts: Collections and properties.
Collections are essentially spreadsheets made up of columns that drop vertically and rows that run horizontally. Your template will have a few premade collections that suit your business's needs.
For example, if you build an e-commerce app, you’ll find collections for your products. You can customize the name of each collection and add new ones.
Properties are the classifications of a collection and are labeled as vertical-dropping columns. These columns contain data, which, for our e-commerce example, can be a product’s price, inventory count, a picture, and more.
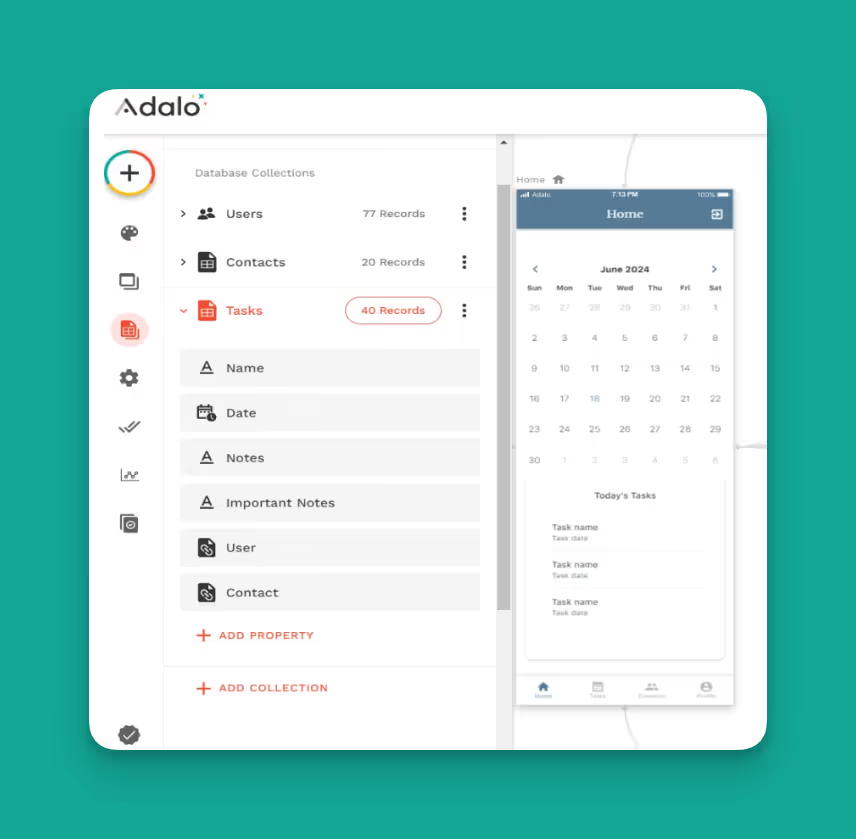
Customizing your database is a breeze. Just click on the collection to see each of its properties. To create a new property or collection, click the “Add Property” and “Add Collection” buttons, and you’re off to the races.
Add Functionality with Actions
Give your app some juice by implementing dynamic actions. Here are just a few dynamic actions you can add to your Adalo-made app:
- Link pages: Linking elements like buttons and text to other screens and external web pages is simple. Find the screen that you want to be your link’s origin. Then, click “Actions” in the left-hand editing box and push the “Add Another Action” button. Select the screen or enter the website you want to link to. Easy peasy!
- Add push notifications: Select the element or button that you want to trigger a push notification. Then, find the “Notifications” button and select “Trigger Notifications.” Fill in who will receive the push notifications, what they’ll say, and when they’ll be sent.
- User authentication: Set up user authentication so folks can join your social network, store membership, restaurant VIP, or become any kind of member. If you’re using a template, it will most likely come preloaded with a sign-in screen, but if not, you can add one in seconds.
After pressing the “+” button at the top of the left-hand drop-down dashboard, select “Add New Screen.” Find the screen with a sign-in form and drag it to your app. Then, click the signup form and connect the “Username” and “Password” fields to their corresponding database collections.
- Create and update records: App users will add info to your database by filling out forms. To create a new record, go to the form you want to gather new data with and select “Which Data Collection” in the left-hand editing box. Then, click “Add a New Collection,” where the data from that form will go. Edit the properties, and you’re good to go.
Need to update your records? Click on the form and navigate to the collection you want to update. Then, select the “What do you want your form to do?” option, and scroll down to “Update Logged in User.” Next, add fields that users will fill out, and you’ll have updated records.
Publish Your App
Adalo lets you publish your app as both a web app and a native mobile app without making any major changes to the app you built. Below, I’ll walk you through the general steps for publishing both a web app and a native mobile app to the Apple App Store and Google Play Store.
How to Publish Your Mobile App to the Web
Before you publish your app to the web, you’ll want to ensure that everything runs smoothly — releasing a sloppy app that crashes will not reflect well on your brand. Here’s how to test and publish your web app:
- First, navigate to the top ribbon menu and push the big green button labeled “View App.” Then, select the “Staging Preview” button and navigate through each screen and feature to double-check that everything’s in order and functioning.
- Now it’s time to get feedback from actual users to determine whether your app is truly ready to go public. Helpfully, Adalo lets you share your web app with others so they can test it out: From the “Staging Preview” button, select the option to “Share Your App.” You’ll be able to send a link to your app via SMS or copy a QR code that you can copy.
- Share your app with a designated number of people. Ask them to provide feedback about your app's user experience and what changes need to be made.
- After receiving your feedback, implement the needed changes and have your users test your app again. If there are no major problems, it’s time to publish your app!
- Select your profile button at the right-hand corner of your top ribbon menu, scroll down to “Settings,” and click “Domain.” In the box that appears, enter your website address.
Return to the building interface and click the “Publish” button — your app is now live on the web!
How to Publish Your Mobile App to the App Stores: Preparation
Publishing to the Apple App Store and Google Play Store will get your app in front of an even larger audience. But before you publish it to these popular app stores, you’ll need to prepare it by completing the following:
- Make a standout icon: After you publish your app to the app stores, users will see it in a search result list amongst many other apps. So, you need your app to grab people’s attention if you want downloads. Ensure your app does this by building an eye-grabbing icon.
You don’t need to be Andy Warhol to make a gorgeous icon. Sign up for a service like Looka to build a beautiful icon without any graphic design experience.
- Write a concise meta description: Before launching, search for apps within your niche on the Apple App Store and Google Play Store. Read the meta descriptions of the top-ranking apps and note the keywords used.
When you write your meta description, slide these keywords in. Ensure that your meta description illustrates all your app’s features. Keep the word count below that of top-ranking apps. No one wants to read an overwritten meta description.
- Use professional screenshots: Only include high-quality screenshots that clearly show your app’s best features. Failure to illustrate the jobs your app executes or providing sloppy pictures will result in very few downloads.
Once you check these three boxes, it’s time to publish your app! The Apple App Store and Google Play Store have different publishing requirements, which we’ll briefly describe below.
How to Publish to the Apple App Store
Navigate to the iOS developer web page and create an account. You’ll need to pay an annual fee of $99. Then, ensure your iOS app is good to go using Testflight, Apple’s testing program. Like testing your web app, you’ll get user feedback, which you should implement.
Return to your Adalo account and push the “Publish” button on your left-hand drop-down dashboard. Follow the procedures and submit your app for publishing.
Because of iOS’s strict standards, you can expect your app to be live in the Apple App Store in as little as a few weeks and as much as a few months.
How to Publish to the Google Play Store
Just like Apple, you can create a developer account by going to the Google Play Console website. Unlike Apple, you’ll only need to pay a one-time $25 fee. Follow the instructions for publishing, and don’t forget to opt-in to let testers try out your app.
Then, return to Adalo, hit the “Publish” button, and provide your info. Google’s publishing wait time is short — usually only a few weeks.
Check out our app-marketing strategy guide if you want to supercharge your app’s marketing plan.
Enhance Your App with Integrations
Adalo has integrations that let you connect to other third-party apps. These integrations allow you to get more data and give your app more power. While adding integration to your app may sound intimidating, it’s actually simple.
The first way to add integrations to your app is by downloading plugins from Adalo’s Component Marketplace. Here, you’ll find plugins and tools, like a calendar, progress bar, signature tool, and more, made by Adalo’s developer community.
To add these to your app, click the “+” button at the top of your left-hand drop-down dashboard and scroll down to “Explore Marketplace.” You’ll find over 100 free and paid plugins.
Adalo also integrates with over 5,000 third-party apps, including QuickBooks, MailChimp, Slack, Zapier, and more.
To add integrations, go to the screen you want, find the element, and scroll down to “Add Action.” Then, find “New Integration” and select your preferred third-party app.
Follow Best Practices for Building with Adalo
Once you’ve finished building your app and getting users, you’ll need to ensure it’s always in tip-top shape. Do this by checking your app’s analytics daily. You can find your analytics reports by pushing the “Analytics” button on your left-hand drop-down dashboard.
Want to see a few apps that people like you have made using Adalo? Head over to Made in Adalo and get a first-hand look at apps made using Adalo’s brilliant building interface. Here’s a sample of a few mobile apps built with Adalo:
- Joy Blossom: If you like meditation, check out Joy Blossom. It’s packed with info like checklists and guided meditations to up your mindfulness game. You’ll also be able to work toward peace-of-mind improvements daily, as Joy Blossom provides a tool to check your emotional health.
- Stew: Stew is made to catch, control, and vanquish anger problems. It comes packed with resources and tools that help folks manage their anger in certain situations, striving to give users autonomy over their emotional triggers.
- Scholarcash: Aimed at soon-to-be college students, Scholarcash makes the scholarship application process easy. It gathers information so students can find scholarships that best match their personal background and educational aspirations.
Ultimately, you’ll be able to create almost any type of app you can imagine using Adalo. Enjoy your no-code mobile app-building journey!


.png)
.png)

